
for the US Army Corps of Engineers GIS Seminar
Adapted for CE 374K by Seth Ahrens
This exercise is intended to instruct you on how to build a base map for a spatial database of the Guadalupe Basin in South Texas. This base map comprises watershed boundaries from the US Geological Survey's Hydrologic Unit Code (HUC) coverage and streams from the US Environmental Protection Agency's River Reach File 1 (RF1) coverage. In addition, you will delineate the watersheds and streams around the base map using the 15" (500m) Digital Elevation Model (DEM) of Texas prepared by the US Geological Survey. The results of the delineated watershed boundaries and the stream networks will be compared to the HUC and RF1 coverages.
This exercise also provides information and links to the basic data sets such as HUC, RF1, and DEM data.
After finishing the exercise, you are expected to be able to build a simple spatial database of the Guadalupe Basin or other similar basins in Texas or elsewhere. The database will include HUC and RF1 coverages, a DEM grid, and watersheds delineated from the DEM at different threshold drainage areas.
Finally, as you are moving through the exercise, keep your eyes open for small tasks you will need to complete and turn in.
All of the exercise will be conducted on Arcview3 with the Spatial Analyst and Hydrologic Modeling Extensions using any of the PC's in LRC 3.301. The files are stored on the civil2 server under LRC/class/maidment/ce374k_97.
The HUC boundaries indicate subdivisions of the US made by the US Geological Survey to show major and minor river basins. There are 2-, 4-, 6-, and 8-digit HUC boundaries, where the larger the number the smaller the area. The HUC8 boundaries are the basic ones. The HUC file, RF1 file and DEM data are taken from a data set covering the whole United States. To conserve space on the LRC server, only data pertinent to Texas are available. The RF1 coverages have the names of the rivers and streams annotated onto the stream arcs. In addition, the state and county boundaries for Texas are also provided. All of the coverages are in Albers Equal Area Projection.
If you are curious, the HUC and RF1 coverages for the United States can be downloaded from the following Internet sites:
USGS Hydrologic
unit code
EPA river reach
files
USGS Digital Elevation
Model (DEM)
You will also find many useful links for obtaining hydrologic data from the Internet from GISHydro97 CD-ROM, GISHydro97 Online and Dr. David Maidment's Homepage.
All of the data used in this exercise can be downloaded from the Internet; however, the preprocess for the all of the data could be very time consuming. Therefore, we preprocessed some of the data sets and stored them on the LRC server.
To start off, you will create your working directory.
On the PC you are using, first make a subdirectory called ex1 in the C:\temp\ directory. Under ex1 make a subdirectory called gisdata, which is where you are going to save your Arcview files as you progress through the exercise.
Before you begin the actual exercise, you also need to move the GIS data onto the computer you are using. Follow the below procedure to do this.
This will move all of the pertinent GIS data (about 18 megs!) onto the computer you are using. Open this directory using Windows Explorer. The data you are looking at should appear something like this:
You may start Arcview3 on any of the PC's in LRC 3.301 by clicking
Start/Programs/Esri/ArcView Gis Version 3.0a/ArcView Gis Version 3.0a
When Arcview3 is first executed, a new Untitled Project window is opened. This window includes several icons marked Views, Tables, Charts, Layouts, and Scripts. This is the main Project window, which allows you to create new Views, Charts, etc., or to open existing ones that you have already created in that project.
Before continuing, you need to verify that the Spatial Analyst and the Hydrologic Modeling Extensions are active. Click on File/Extensions, and a list of available extensions will appear. Make sure both the Spatial Analyst and the Hydrologic Modeling Extensions are selected and click OK.
Another thing you need to do before moving on is let Arcview know where it can write temporary calculation files on the c: drive. Choose Project/Properties, and the Project Properties window will appear. Under Work Directory in this window type c:\temp\ and then click OK.
Now, be sure that the View icon is highlighted in the Project
window and click on New for a new view. Drag the view window out
of the way and resize it if necessary. Add a new theme to the view by clicking
on the Add Theme button ![]() on
the top tool bar. Go to c:\temp\ce374k_97\ and select huc250.shp
and st2mtx.shp (hold the Shift key while selected the second coverage)
and click OK to add them to your View1 window. They will
each show up as a bar in the legend portion of the View1 window
with the name of the coverage shown on it. Those coverages are called themes
in Arcview. Drag themes (by clicking beside the theme symbol, holding down
the mouse and dragging the box that appears) to arrange the order of them
so they will show in the order of st2mtx.shp and huc250.shp
from bottom to top. The order is important since it indicates the actual
order of the map layers. Following the order from the bottom to the top,
click on the raised box to the left of the theme names to make a checkmark
and see the coverages displayed in the View window. You will first see
st2mtx.shp, which delineates the state of Texas, and then you will
see the HUC250 basin for the area which contains the Guadalupe Basin. Next,
you need to edit the st2mtx.shp theme to make Texas transparent.
To do this, simply click on the colored rectangle under st2mtx.shp
in the View1 window. This causes a Legend Editor to appear.
In this editor, click on the colored rectangle, which prompts the Fill
Palette to appear. To make Texas transparent, click on the upper-left-hand
box (black-bordered square filled with white) in the Fill Palette.
After you have done this, click Apply in the Legend Editor and close
the Legend Editor and Fill Palette boxes by clicking on the
x in their top right corner.
on
the top tool bar. Go to c:\temp\ce374k_97\ and select huc250.shp
and st2mtx.shp (hold the Shift key while selected the second coverage)
and click OK to add them to your View1 window. They will
each show up as a bar in the legend portion of the View1 window
with the name of the coverage shown on it. Those coverages are called themes
in Arcview. Drag themes (by clicking beside the theme symbol, holding down
the mouse and dragging the box that appears) to arrange the order of them
so they will show in the order of st2mtx.shp and huc250.shp
from bottom to top. The order is important since it indicates the actual
order of the map layers. Following the order from the bottom to the top,
click on the raised box to the left of the theme names to make a checkmark
and see the coverages displayed in the View window. You will first see
st2mtx.shp, which delineates the state of Texas, and then you will
see the HUC250 basin for the area which contains the Guadalupe Basin. Next,
you need to edit the st2mtx.shp theme to make Texas transparent.
To do this, simply click on the colored rectangle under st2mtx.shp
in the View1 window. This causes a Legend Editor to appear.
In this editor, click on the colored rectangle, which prompts the Fill
Palette to appear. To make Texas transparent, click on the upper-left-hand
box (black-bordered square filled with white) in the Fill Palette.
After you have done this, click Apply in the Legend Editor and close
the Legend Editor and Fill Palette boxes by clicking on the
x in their top right corner.

Saving Your Project
In order not to have to repeat what you've already done in the event that you have a crash, you need to save your project. To do this, click on the Project window and using File/Save As to save the project file .apr in c:\temp\ex1\gisdata as guad.apr. Continue to save your project from time to time as you complete further portions of this exercise.
At this point, it is important for you to know what an active theme is. When you click beside the theme symbol, there is a raised bar around the theme name; this theme is the active theme. Any action relation to this theme such as Delete Themes, Zoom to Theme or Theme Properties etc. will be performed on this active theme, even though the theme may not be displayed, either because the theme is not on the top layer or the checkmark is not turned on.
You can use![]() or
or![]() to
zoom in or zoom out from a portion of the View window . To zoom to the
extent of active themes, use the tool
to
zoom in or zoom out from a portion of the View window . To zoom to the
extent of active themes, use the tool ![]() in
the upper row of the tool bar. To zoom to the full extent, use the tool
in
the upper row of the tool bar. To zoom to the full extent, use the tool
![]() .
.
By selecting the Identify tool![]() in
the View tool bar and then clicking on a map feature in the View, you can
find out information about any feature in the active theme (a display of
its record in the data table). If you click on a feature and do not see
the correct record displayed, check to see if the theme you are interested
in is active.
in
the View tool bar and then clicking on a map feature in the View, you can
find out information about any feature in the active theme (a display of
its record in the data table). If you click on a feature and do not see
the correct record displayed, check to see if the theme you are interested
in is active.
Building a Base Map Based on Hydrologic Unit Code (HUC)
The first thing you need to do is zoom in to south Texas with
the ![]() button. Using the Identify tool
button. Using the Identify tool![]() ,
click on different HUC's to see their attributes. (Verify that huc250.shp
is active.) The HUC's we are interested in are the Upper, Middle, and Lower
Guadalupe and San Marcos HUC's. Since the Guadalupe basin contains several
HUC basins, you will use the Query Builder tool
,
click on different HUC's to see their attributes. (Verify that huc250.shp
is active.) The HUC's we are interested in are the Upper, Middle, and Lower
Guadalupe and San Marcos HUC's. Since the Guadalupe basin contains several
HUC basins, you will use the Query Builder tool ![]() to select the appropriate HUC's. Click on
to select the appropriate HUC's. Click on ![]() ,
which causes the Query Builder window to appear. Under "Fields",
scroll down to [Huc6] and double-click on it. Next, click on the "="
sign. Finally, under "Values", scroll to "121002" and
double-click on it. You will notice that your sequence has been recorded
(in parentheses) in the Query Builder's scratch pad.
,
which causes the Query Builder window to appear. Under "Fields",
scroll down to [Huc6] and double-click on it. Next, click on the "="
sign. Finally, under "Values", scroll to "121002" and
double-click on it. You will notice that your sequence has been recorded
(in parentheses) in the Query Builder's scratch pad.
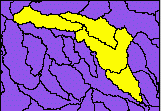
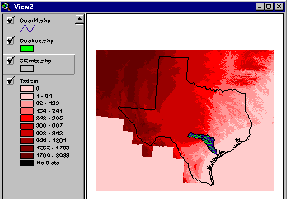
Select New Set in the Query Builder window; you will see a blue bar appear at the bottom of the view. After it disappears, close the Query Builder window and go back to Arcview. In View1, the four applicable HUC's should be highlighted. Your View should look something like the following image:
Building the Guadalupe Basin Base Map
You will build the rest of your base map around these selected basins.
Keeping the huc250.shp theme active, click on Theme on the
menu bar and select Convert to Shapefile; save this shapefile in
your ex1/gisdata directory under the name guahuc.shp. For
the question "Add shapefile as theme to the view?", choose
Yes. Notice that a new theme called guahuc.shp will appear
in the View1 window. Lets take a closer look at the attributes of
this coverage. Highlight the guahuc.shp theme and click on the ![]() button.
You'll see a table of basin attributes appear. Move this if necessary so
you can see both the view and the table at the same time. Click a row in
the table and you'll see the corresponding feature in the map highlighted.
Pretty cool!!! This one to one relation between graphical and tabular data
is one of the defining characteristics of a geographic information system.
You can remove selected features using the
button.
You'll see a table of basin attributes appear. Move this if necessary so
you can see both the view and the table at the same time. Click a row in
the table and you'll see the corresponding feature in the map highlighted.
Pretty cool!!! This one to one relation between graphical and tabular data
is one of the defining characteristics of a geographic information system.
You can remove selected features using the ![]() button.
The units of length and area in this table are in meters.
button.
The units of length and area in this table are in meters.

To be turned in: What is the total area of the Guadalupe basin in km2? What are the names of its four sub-basins? What are their areas in km2?
Building Stream Networks Based on RF1
You are now going to include the river-reach file for the Guadalupe
Basin. To do this, click the Add Theme button ![]() .
From c:\temp\ce374k_97 grab the rf1.shp theme. Make sure
that this theme is located on top of the other themes in the View
with its checkmark activated.
.
From c:\temp\ce374k_97 grab the rf1.shp theme. Make sure
that this theme is located on top of the other themes in the View
with its checkmark activated.
To select the river reaches applicable to the Guadalupe Basin, make
the rf1.shp theme active and use the Query Builder![]() .
In the Query Builder window, double click on "[Huc6]"
under "Fields", "=", and "121002" from "Values".
Then select New Set and close the Query Builder window. The
arcs located in the base map should now be highlighted. Keeping the rf1.shp
theme active, covert it to shapefile guarf1.shp using Theme/Convert
to Shapefile. Make sure you save this file to your gisdata directory.
Add the shapefile as theme to the view when prompted to do so. Finally,
make sure that the guahuc.shp theme is under the guarf1.shp
theme. To recolor the streams blue, click on the guarf1.shp theme, open
the Legend Editor, choose the Color Palette, and select a nice color for
your streams.
.
In the Query Builder window, double click on "[Huc6]"
under "Fields", "=", and "121002" from "Values".
Then select New Set and close the Query Builder window. The
arcs located in the base map should now be highlighted. Keeping the rf1.shp
theme active, covert it to shapefile guarf1.shp using Theme/Convert
to Shapefile. Make sure you save this file to your gisdata directory.
Add the shapefile as theme to the view when prompted to do so. Finally,
make sure that the guahuc.shp theme is under the guarf1.shp
theme. To recolor the streams blue, click on the guarf1.shp theme, open
the Legend Editor, choose the Color Palette, and select a nice color for
your streams.
Before you continue, turn the checkmark off of every theme except for
the guarf1.shp and the guahuc.shp themes. After making guahuc.shp
the active theme, click on the Zoom to Active Theme button ![]() To re-orient yourself in Texas, you are now going to add the state's county
boundaries. To do this, click on the Add Theme button
To re-orient yourself in Texas, you are now going to add the state's county
boundaries. To do this, click on the Add Theme button ![]() and select the cty2mtx.shp theme from the same location where you
have retrieved the previous themes. Make sure that the cty2mtx.shp
theme has its checkmark activated. You should also place the cty2mtx.shp
theme under both the guarf1.shp and guahuc.shp themes so
that the map layering is correct. Next, make the counties transparent the
same way as you made the entire state of Texas transparent earlier in the
exercise by clicking on the colored rectangle under cty2mtx.shp
and performing the necessary actions in the Legend Editor.
and select the cty2mtx.shp theme from the same location where you
have retrieved the previous themes. Make sure that the cty2mtx.shp
theme has its checkmark activated. You should also place the cty2mtx.shp
theme under both the guarf1.shp and guahuc.shp themes so
that the map layering is correct. Next, make the counties transparent the
same way as you made the entire state of Texas transparent earlier in the
exercise by clicking on the colored rectangle under cty2mtx.shp
and performing the necessary actions in the Legend Editor.
At this point, PRINT OUT your map by clicking on Layout under the View selection on the main menu. Select your preferred printing orientation in the Template Manager. You can edit or delete objects in your layout by clicking on them. Choose Print from the File menu to print the map. Close the Layout window when you are finished.
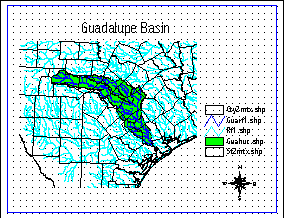
To be turned in: a map of the Guadalupe Basin.
CONGRATULATIONS! You have successfully developed the base map and the first data set rf1 for the spatial database .
Watershed and Stream Network Delineation based on Digital Elevation Model (DEM)
In this part of the exercise, you will delineate watersheds and stream networks at different thresholds using DEM. You will use Arcview's Hydrologic Modeling Extension to conduct most of the work.
Retrieving the DEM for the Guadalupe Basin
Open a new View by double-clicking on the View icon ![]() in
the Project window. Click on
in
the Project window. Click on ![]() to
add in the themes guahuc.shp and guarf1.shp from your gisdata
directory and txdem and st2mtx.shp from c:\temp\ce374k_97.
Notice that the txdem file is a grid dataset, so you have to change
the Data Source Types in the Add Theme window to Grid
Data Source instead of the default Feature Data Source in order
to see the grid data.
to
add in the themes guahuc.shp and guarf1.shp from your gisdata
directory and txdem and st2mtx.shp from c:\temp\ce374k_97.
Notice that the txdem file is a grid dataset, so you have to change
the Data Source Types in the Add Theme window to Grid
Data Source instead of the default Feature Data Source in order
to see the grid data.
Make sure that the themes are in the order of txdem, st2mtx.shp,
guahuc.shp, and guarf1.shp from the bottom to the top and
that all of the their checkmarks are turned on. In addition, make st2mtx.shp
transparent using the techniques you employed earlier in exercise. Make
st2mtx.shp the active theme and click on the Full Extent
button ![]() .
The image in your view shows the state of Texas as well as the Guadalupe
Basin. The txdem image is a DEM of Texas plus surrounding areas.
.
The image in your view shows the state of Texas as well as the Guadalupe
Basin. The txdem image is a DEM of Texas plus surrounding areas.
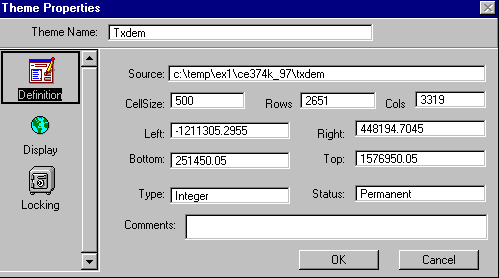
The properties of this Txdem them can be interpreted by highlighting the Txdem theme in the view, and then choosing Theme/Properties. You'll see a display like the one below in which the cell size (m), the number of rows and columns in the Grid is specified, and the Map Extent is defined by two points (Left, Bottom) and (Right, Top) whose coordinates are given in meters.
To be turned in: How many cells are there in this grid? What area (km2) does it cover? If the area of Texas is 700,000 km2, what proportion of the area of this grid is actually within the borders of Texas?
The series of actions you perform next will cut out the piece of the
DEM in the vicinity of the Guadalupe Basin. To do this, first zoom in to
the Guadalupe Basin by making the guahuc.shp theme active and clicking
the zoom to active theme button ![]() .
Now make txdem the active theme and choose Properties under
the Analysis menu, which causes the Analysis Properties window
to appear. For Analysis Extent select Same as Display and
for Analysis Cell Size choose Same as txdem. Finally, click
OK.
.
Now make txdem the active theme and choose Properties under
the Analysis menu, which causes the Analysis Properties window
to appear. For Analysis Extent select Same as Display and
for Analysis Cell Size choose Same as txdem. Finally, click
OK.
The next step is to select Map Calculator from the Analysis
menu. This should cause the Map Calculation1 window to appear. In
this window, double-click on [txdem] under the Layers list.
Notice that [txdem] has been recorded in the scratch pad. Click
Evaluate. Map Calculator will now create a new DEM which
will include the part of txdem in the Guadalupe Basin. At the end
of the calculations, close the Map Calculation 1 window and look
at View2. You should see a new grid called Map Calculation 1.
Map Calculation 1 is a temporary file, so you need to save it to
your gisdata directory as guadem using Save Data Set
from the Theme menu. (Remember to make Map Calculation 1
the active theme before you save it.) Use the ![]() tool
to click on the DEM to show the elevation values in meters. Begin in the
Gulf of Mexico where the elevation (Value) is 0 meters and go inland
progressively to see how the elevation rises. The Count number which
is reported beneath the Value for elevation is the number of cells in the
grid that have this elevation.
tool
to click on the DEM to show the elevation values in meters. Begin in the
Gulf of Mexico where the elevation (Value) is 0 meters and go inland
progressively to see how the elevation rises. The Count number which
is reported beneath the Value for elevation is the number of cells in the
grid that have this elevation.
 (Click the thumbnail to see more detailed picture.)
Watershed Delineation based on DEM using Hydrologic Modeling Extension
Now you are ready to delineate the watershed for the Guadalupe Basin. This part of the work usually needs to be done in Arc/Info; however, in this exercise, you will use the Hydrologic Modeling Extension to finish the exercise.
Filling the DEM
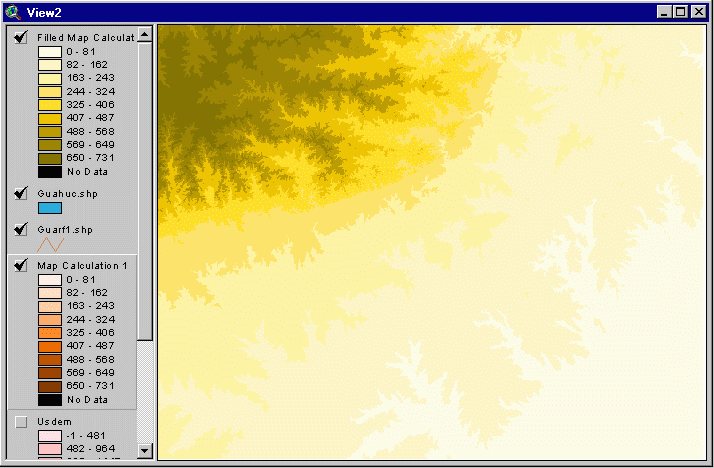
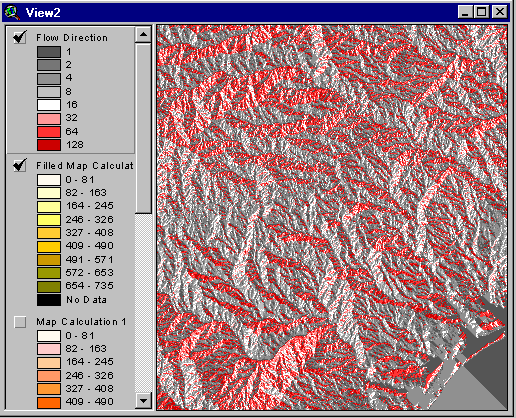
In order for water to "flow" across the landscape, any spurious pits have to be filled in. Make the theme Map Calculation 1 active and choose Fill under Hydro menu. A new grid of Filled Map Calculation 1 will show up in View2 after a while. Save the data set as guafil in your gisdata directory using menu Theme/Save Data Set. After you turn on the checkmark of Filled Map Calculation 1, your window should look something like this:
 (Click
the thumbnail to see more detailed picture)
(Click
the thumbnail to see more detailed picture)
Flow Direction Grid
The next step is to calculate the flow direction grid. The cells flow to their nearest neighbor along 1 of 8 compass directions labeled as East = 1, SE = 2, S = 4, SW=8, W=16, NW=32, N=64, NE=128. The flow direction function assigns to each cell a number corresponding to which of the 8 neighboring cells lies on the path of steepest descent.
Make the theme Filled Map Calculation 1 active and choose Flow
Direction under the Hydro menu. A Flow Direction grid will be
calculated and shown in View2 in a few moments. Display the Flow
Direction grid and save it as guafdr in your gisdata
directory using menu Theme / Save Data Set. You can use button![]() to
query the any cell value. The value should be one of the eight numbers
listed above. You can get a better idea of the aspect of the terrain by
recoloring the flow direction theme. Click on this theme bring up the Legend
Editor and choose Legend Type: Graduated Color, Classification
Field: Value, Classify the Values with Number of Classes:
8, Round values at: d and in the Value Column in the Legend
Editor, type in the values 1, 2, 4, 8, 16, 32, 64, 128, which correspond
to the 8 points of the compass going clockwise from East = 1, Southeast
= 2, South = 4, etc. Choose color ramp: Greys to Reds Dichromatic.
to
query the any cell value. The value should be one of the eight numbers
listed above. You can get a better idea of the aspect of the terrain by
recoloring the flow direction theme. Click on this theme bring up the Legend
Editor and choose Legend Type: Graduated Color, Classification
Field: Value, Classify the Values with Number of Classes:
8, Round values at: d and in the Value Column in the Legend
Editor, type in the values 1, 2, 4, 8, 16, 32, 64, 128, which correspond
to the 8 points of the compass going clockwise from East = 1, Southeast
= 2, South = 4, etc. Choose color ramp: Greys to Reds Dichromatic.
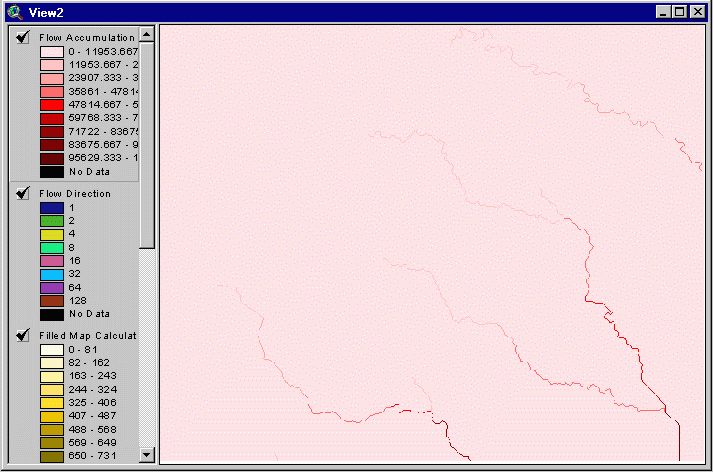
Flow Accumulation Grid
The next step is to calculate the flow accumulation grid. This grid counts all the cells upstream of a given cell.
Make the theme Flow Direction active and choose menu Hydro / Flow Accumulation, you will see a blue bar moving at the bottom of the view - it is calculating! After the Flow Accumulation grid is shown in the view, display it and save it as guafac in your gisdata directory using menu Theme/Save Data Set. Your View should be similar to the following image:
 (Click
the thumbnail to see more detailed picture)
(Click
the thumbnail to see more detailed picture)
Watersheds Delineation
Now comes the last step, watershed delineation. You need to specify which flow direction grid and which flow accumulation grid you will use for the watershed delineation in case you have more than one of each of them in the View. Choose menu Hydro / Properties, and in the Hydro Properties window, enter in the names of the flow direction and accumulation grids you will use for watershed delineation. In this case, the names are just flow direction and flow accumulation.
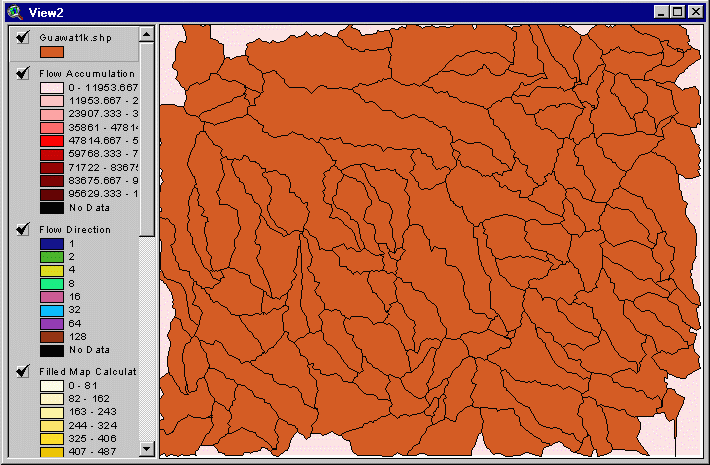
Make the theme Flow Accumulation active and choose Hydro / Watershed. The Watershed window asks for the minimum number of cells for a basin. You will get a different result depending on the threshold value (this means the minimum drainage area upstream necessary to define a stream) of flow accumulation used. The cell size is 500 m. Each cell is 500 x 500 m = 250,000 m2 = 0.25 km2 in area, so 1000 cells = 250 km2 in drainage area, and 10,000 cells = 2,500 km2 in area. Let us delineate the streams for a 1,000-cell flow accumulation threshold. Change the default value 500 to 1000 and select OK. You will see a blue bar moving at the bottom of the view - it is calculating!
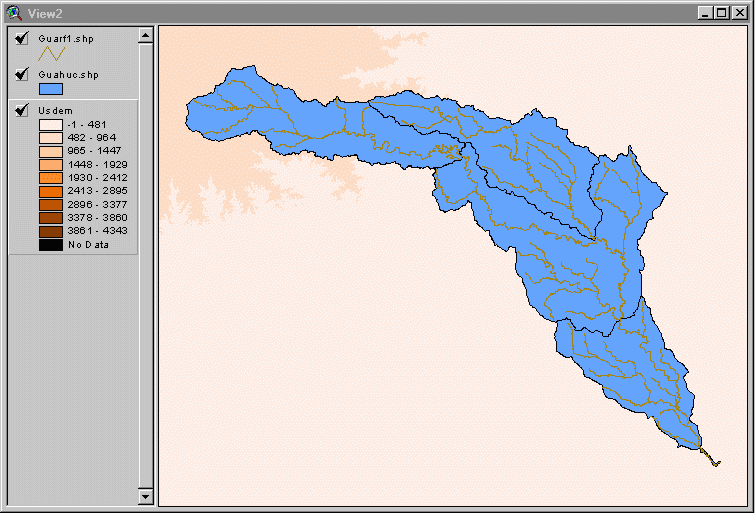
After the watershed grid shows up in the view, click the theme's checkmark to display it. You have to convert the grid to a shapefile for it to be able to be compared with the HUC base map. Making sure the watershed theme is active, choose Theme/Convert to Shapefile and save the file as guawa1k.shp in your gisdata directory. When you are asked whether you wish to add the shapefile as a theme to View2, select Yes. You may notice that the outlines of the watersheds from the different sources are very similar; however, the delineated watersheds are much more detailed than the HUC base map. This is because the 1000-cell threshold is relatively small. Delete the watershed grid by making it active, then choosing Edit/Delete Themes. As a check, verify that your image is similar to the following image:
 (Click
the thumbnail to see more detailed picture)
(Click
the thumbnail to see more detailed picture)
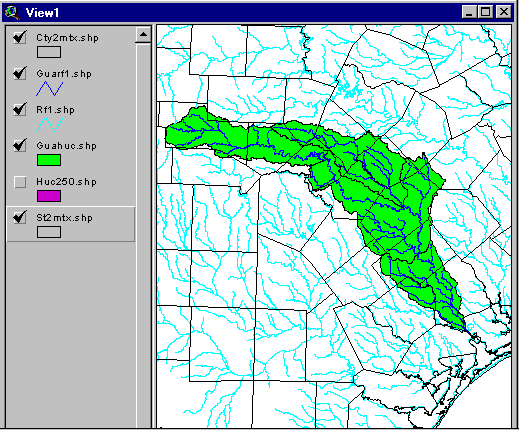
You can hide the legend of themes with extensive legends using Theme/Hide Legend. This helps to keep all the themes in your view displayed where you can see them. In order to compare the delineated watershed to the HUC base map, you need to move guahuc.shp to the top layer and display it as an outline. To do so, first turn off the checkmarks of all of the themes except guawa1k.shp and guahuc.shp. Second, move guahuc.shp to the top of the theme list in the View and make it transparent as you have made other themes transparent earlier in the exercise except for one difference--in the Fill Palette, increase the outline to 2.0. This will cause the boundaries in guahuc.shp to be thicker than the rest of the lines in the image. As a check, your image should be comparable to the following graphic:
 (Click
the thumbnail to see more detailed picture)
(Click
the thumbnail to see more detailed picture)
Take some time right now to compare the two images.
Now delineate the watershed at 5000-cell and 10000-cell thresholds, choose Theme/Convert to Shape file for each, and save your data as guawa5k.shp and guawa10k.shp respectively in your gisdata directory. Delete the watershed grids which you just created. Now compare guawa5k.shp and guawa10k.shp to the guahuc.shp theme; you will see that guawa10k.shp resembles the HUC base map for the Guadalupe Basin more closely than guawa5k.shp.
Compare your images to those below:
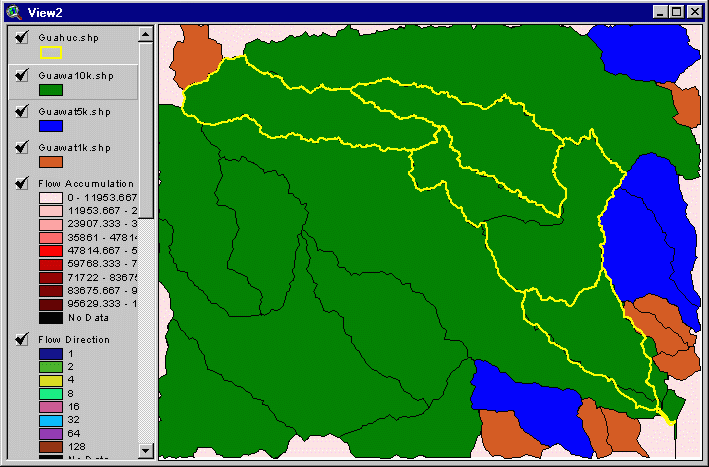 guawa5k.shpguawa10k.shp
(Click the thumbnail to see more detailed picture)
To be turned in: a Layout printed of the guawa10k.shp theme compared to the HUC boundaries of the Guadalupe watershed.
Building Guadalupe Basin Map based on the Watersheds delineated from DEM
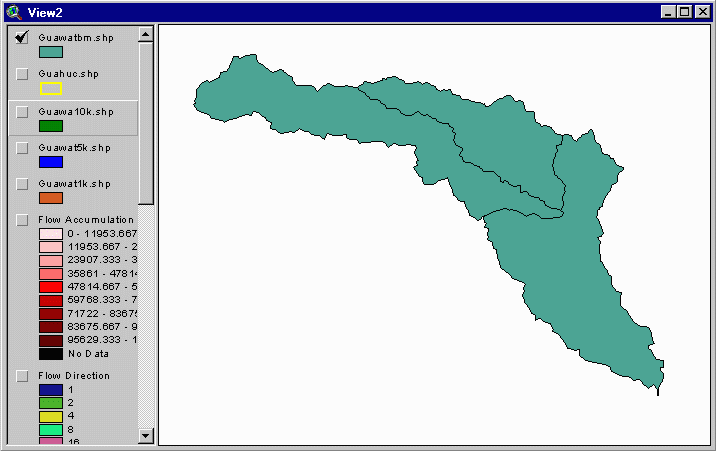
Each of the watersheds delineated from the DEM can be used to build the base map. Let's use guawa10k.shp as an example.
Make the theme guawa10k.shp active and display it at the top
layer. Next, click on the Select Feature tool ![]() .
Hold down the shift key, and click within the area outlined by guahuc.shp
until all of the polygons of guawa10k.shp within the guahuc.shp
outline are selected ( highlighted ). Choose Theme/Convert to Shape
file and save it as guawatbm.shp in your gisdata directory.
.
Hold down the shift key, and click within the area outlined by guahuc.shp
until all of the polygons of guawa10k.shp within the guahuc.shp
outline are selected ( highlighted ). Choose Theme/Convert to Shape
file and save it as guawatbm.shp in your gisdata directory.
Now you have a second base map, which should be very similar to guahuc.shp.
 (Click
the thumbnail to see more detailed picture)
(Click
the thumbnail to see more detailed picture)
Building a stream network based on the DEM
You can also build your stream network via the Hydrologic Modeling Extension and compare it to the RF1 file.
First, choose Analysis / Map Query. In the Map Query 1 window, double click "[Flow Accumulation]" under the "layer", select ">", then type in 250 (as the threshold of cell number), and finally click Evaluate. A new grid of Map Query 1 will show up in View2. Map Query assigns a value of one to all the cells that have a flow accumulation cell value greater than 250, and zero to all of the other cells. Close Map Query 1 and drag the theme guarf1.shp to a position above Map Query 1 grid; you will notice that they are very similar, which means that the 250-cell threshold is a good number to choose. At this point, you should compare your image to this image:
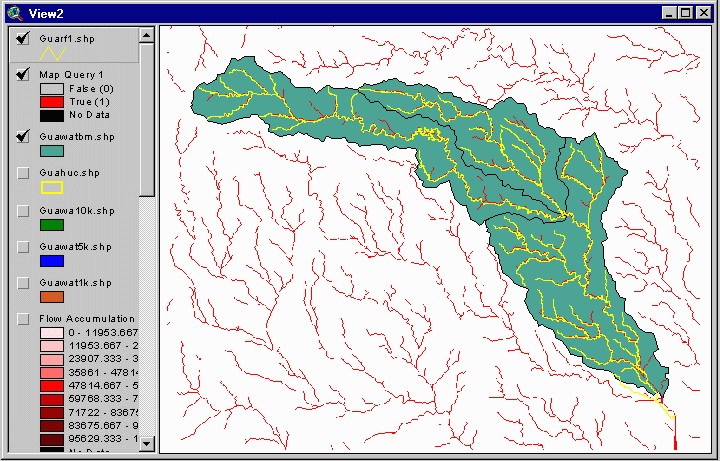 (Click
the thumbnail to see more detailed picture)
(Click
the thumbnail to see more detailed picture)
Take a close look at the two different base maps, watersheds and stream networks obtained from different resources; they are very close yet not identical. The reason is that there are many factors that would affect the watersheds and stream network--DEM is just one of them. We believe that digitized stream networks such as RF1, RF3, or DLG provide more accurate representation for the real watersheds and stream networks. For a terrain analysis that does not require high accuracy, the basic delineation procedure should be good enough; however, for a more detailed analysis, this could cause some problems. In this case, we would suggest that you use burn_in DEM instead of the regular DEM. For more information about burn_in DEM and the procedure for more detailed analysis, please refer to Spatial Hydrology of the Urubamba River System in Peru Using Geographic Information Systems (GIS) by Francisco Olivera, Ph.D.
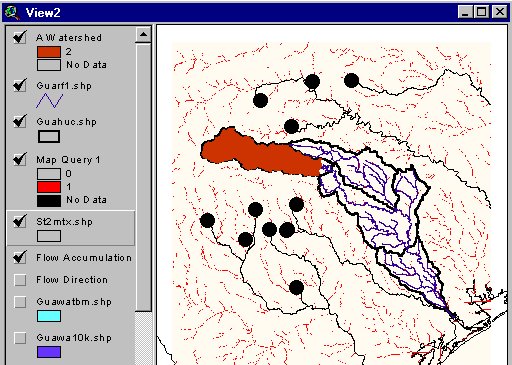
In this final section, you will be able to determine the delineation of the watershed from any location on a grid stream. In addition, you will also be able to determine the delineation of the flow path downstream of any point within the watershed. To carry out this task, first move guarf1.shp to the top of the theme list with guahuc.shp directly under it. Next, move flow direction under guahuc.shp. Finally, move the flow accumulation theme under the flow direction theme. Once you have done this, turn the checkmarks on for the guarf1.shp, guahuc.shp, and the flow accumulation themes. Now make the flow direction theme the active theme. At this point, you will be to do one of two things. To delineate the watershed at any point on the grid, click on the "W" icon in the top menu. After you do this, click on any point within the basin. ArcView will determine the outline the watershed in which this point resides. To view this watershed, turn on the checkmark next to the new watershed theme. Frequently, this watershed will be small compared to the basin, so you may have to turn off the checkmarks for guarf1.shp and guahuc.shp. Zoom in to make sure that you clicking right on the gridded stream. The watershed shown below is that draining into Canyon Lake.
After you have tested this feature, delete any watershed themes you have created using Edit/Delete Themes in the main menu. Make sure that you also turn the checkmarks back on for the guarf1 and guahuc themes and that the flow direction theme is active. Now select the "R" icon in top menu. Click on any point in the basin, and Arcview will delineate the flow path downstream from that point. An interesting thing to do after you have done this is to turn the checkmarks off all of the themes except for the flow directon theme. The flow path that is drawn on the flow direction grid may help read the flow direction theme more easily. The origin of each path is marked with a large dot as shown below.
Congratulations! You've finished the exercise. If anything, we hope that this short example has given you some insight to the power of GIS.
Before you leave, you'll need to clean up:
On your PC, simply delete the ex1 folder and the data files you downloaded from the LRC server.
Ok! Now you're finished!
Go to Dr Maidment's Home Page